Cookie Art workshop
August 28, 2014
By
Colleen Cross
Jessie Jones leads a double life. From Monday to Friday, she is a
full-time chef at London Bridge daycare in London, Ont., where she has
provided meals and snacks since 2009.
Jessie Jones leads a double life. From Monday to Friday, she is a full-time chef at London Bridge daycare in London, Ont., where she has provided meals and snacks since 2009.
 |
|
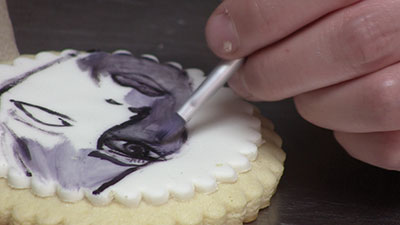
| Let the vodka sit for a couple of seconds, then move it back and forth with the brush, blending and pushing to get the look you want.
|
In the time left between work and her job as mom to 1-1/2-year-old daughter Everly-Lane, she is an artist who creates amazing works of edible art using cookies, cakes and cupcakes as her canvases.
The professional chef, a graduate of Fanshawe College’s culinary management program, is a food purist who believes in baking everything from scratch and using locally sourced ingredients. She also has a passion for the creative side of food that she has developed through her baking artistry business, Jonesin’ for Cake.
Jones’ interest in decorating ignited while she was on maternity leave with her daughter in 2012.
“The chef in me met the artist in me,” she says.
Her two sides will merge completely when she opens her own storefront, a move planned for January 2015.
“I registered the business in January 2014 … I am booked into October with custom cake jobs, so I can see a future,” she says. At the moment, she is using the premises of caterer Chef Les Cooks, run by Les Kozachuk, in a quiet London neighbourhood outside his business hours.
However, the hunt is on to find a location of her own.
While her ultimate goal is to design original cakes, there are challenges such as finding the right customers.
“It’s a very niche market and you can’t please everyone,” she says. Part of the process involves educating customers on the value – and costs – of what she does.
Techniques
Three methods Jones favours for decorating cookies are hand-stamping, creating patterns using stencils and hand-painting. With all these techniques there are three basic steps:
Lay fondant or royal icing (she prefers fondant but either will work) on a basic sugar cookie. Use corn syrup to help the icing adhere.
Decide on a method to transfer the design onto the cookie surface, whether it is drawing freehand, tracing using paper, or applying stamps or stencils.
Create a palette and dilute with pure lemon extract while using vodka to allow further manipulating, shifting and removal of the paint.
What you need
Food-colouring paints (edible): either concentrated colours or edible dust paint (Jones’ medium of choice). Available in a chalk form, it mimics watercolour and can be used as a dry dust or applied with lemon extract to achieve a wetter consistency.
- Lemon extract
- Vodka
- Corn syrup
- Shortening
- Parchment or wax paper for tracing
- Palette
- Paintbrushes of different thicknesses, some curved
- Rubber stamps, found in many craft stores
- Clear acrylic stamp block
- Food-writing pens, thin and thick
- Flexible rubber stencils
- Paper towels for clean-up
Drop colour into your palette, remembering a little goes a long way. Add a tiny amount of lemon extract or vodka, which evaporates immediately to provide a streak-free finish.
Don’t use water to dilute your paint, she warns.
“It doesn’t evaporate and it doesn’t dry. You will have tacky, sticky cookies forever and ever, and packaging will be a nightmare.” To thicken the consistency, use glycerine or work straight out of the colour cap.
Hand-stamping
 |
|
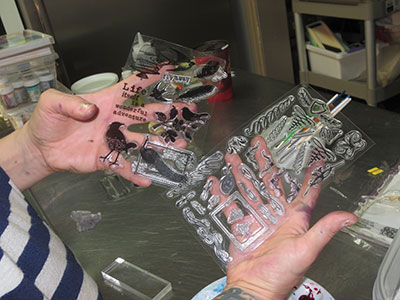
| With so many stamps available, design options are nearly endless.
|
Jones encourages cookie artists to experiment with stamping as a fun, easy way to customize a cookie.
Stamps typically come in flat sheets to be peeled off as needed. Stick the stamp onto a block, which will hold it in place. A clear acrylic block lets you see the design as you work. Use a wide-tip food-writing pen to apply the paint; this allows for more even distribution. Make sure you cover the entire stamp. Press the stamp onto the cookie, using even pressure.
Stencil Patterns
 |
|
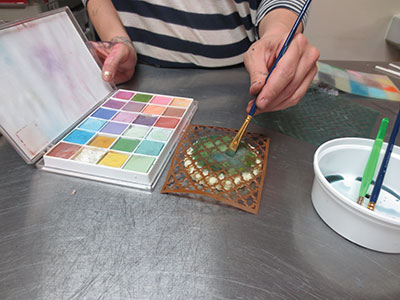
| Using dry dust paint lets you be precise with colour when stencilling.
|
Jones also likes to create coloured patterns using stencils. For this technique, she says flexible rubber stencils work best.
Dry dust paint lets you be precise with colour. Rub shortening onto the icing base to prevent the stencil from shifting unexpectedly. Lay the stencil on the cookie surface. Push the dust into the stencil holes using a wide-tip pen.
Going from colour to colour without changing brushes creates a muted, transcendent effect. Alternatively, you may want to stick to one solid colour at a time. Either way, you can’t go wrong.
“It doesn’t take long to achieve a really stunning look,” Jones says.
Hand-painting
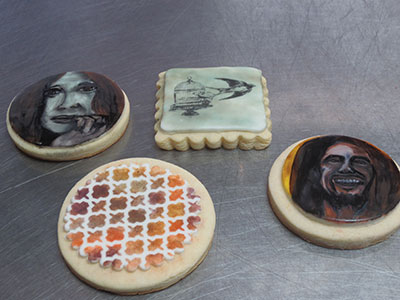
Jones enjoys painting realistic-looking portraits on her cookies. To do this, she recommends using vodka to keep the paint fluid and to remove it when necessary. She likes to draw everything freehand.
“I’m kind of a risk-taker,” she says.
The more cautious may want to trace a design onto the cookie using parchment or wax paper. To do this, trace the picture onto the paper, then trace over it more heavily. Pat a little shortening onto the wax paper design using a paper towel until it appears dry, then lift and push the wax paper onto your cookie, applying light pressure. With your pencil or the end of a brush, trace the picture. When you lift the paper, a slight indentation will remain.
Eyeball the outline of the picture, or face, and sketch in the hair, the eyes, the mouth and the bridge of the nose.
“Every project has an ugly stage,” says Jones. “It takes time to bring it together. As you keep painting, it will come alive. I promise.”
 |
|
| Stamping, stencilling and painting can complement one another.
|
Pour vodka into a small dish. This medium will allow you to manipulate the paint. Using a wider brush, dip into the vodka and dab it onto the cookie to fill in the face, then apply the paint, for example, black and white to create grey. Apply concentrated black around the facial features. You can now pull the colour around to achieve fine details and shading.
Sketch out the overall picture, polishing various areas of the picture later on. Use vodka as needed to remove colour where you want to lighten the picture. Let the vodka sit for a couple of seconds, then move it back and forth with the brush, blending and pushing to get the look you want. As the colours merge, the painting will look more like a black-and-white photo. If you make a mistake, the vodka will take the colour right off, says Jones.
“It takes a lot of trial and error to get the look you want,” says Jones. “But if you don’t like what you’re doing, it’s not difficult to start over or change it up. It’s pretty forgiving.”
The chef-mom-entrepreneur divides her time among passions, but says it can be difficult to stay motivated when working alone. She recommends learning new techniques, taking classes and watching online demonstrations to feed your creativity and push your limits. “Learning can be addictive,” she says.
Print this page
Leave a Reply