Delightful Danishes
May 23, 2014
By Alan Dumonceaux
We are reminded every day why we bake for a living. Daily, we take a
variety of raw ingredients and turn them into visually appealing,
nutritious, flavourful finished products.
We are reminded every day why we bake for a living. Daily, we take a variety of raw ingredients and turn them into visually appealing, nutritious, flavourful finished products. Having the training and skill to make a rich layered Danish pastry that is loved by your customer is a very gratifying part of being a baker. Making laminated products successfully is certainly one of the more challenging products to make. Challenges are good, because at the end of your day, you go home and reflect on the fact that yes, a baker is highly skilled and trained, and you can take pride in your accomplishments.

|
|
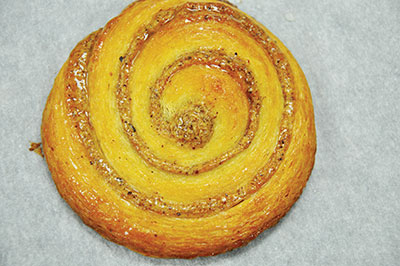
| Hazelnut Danish
|
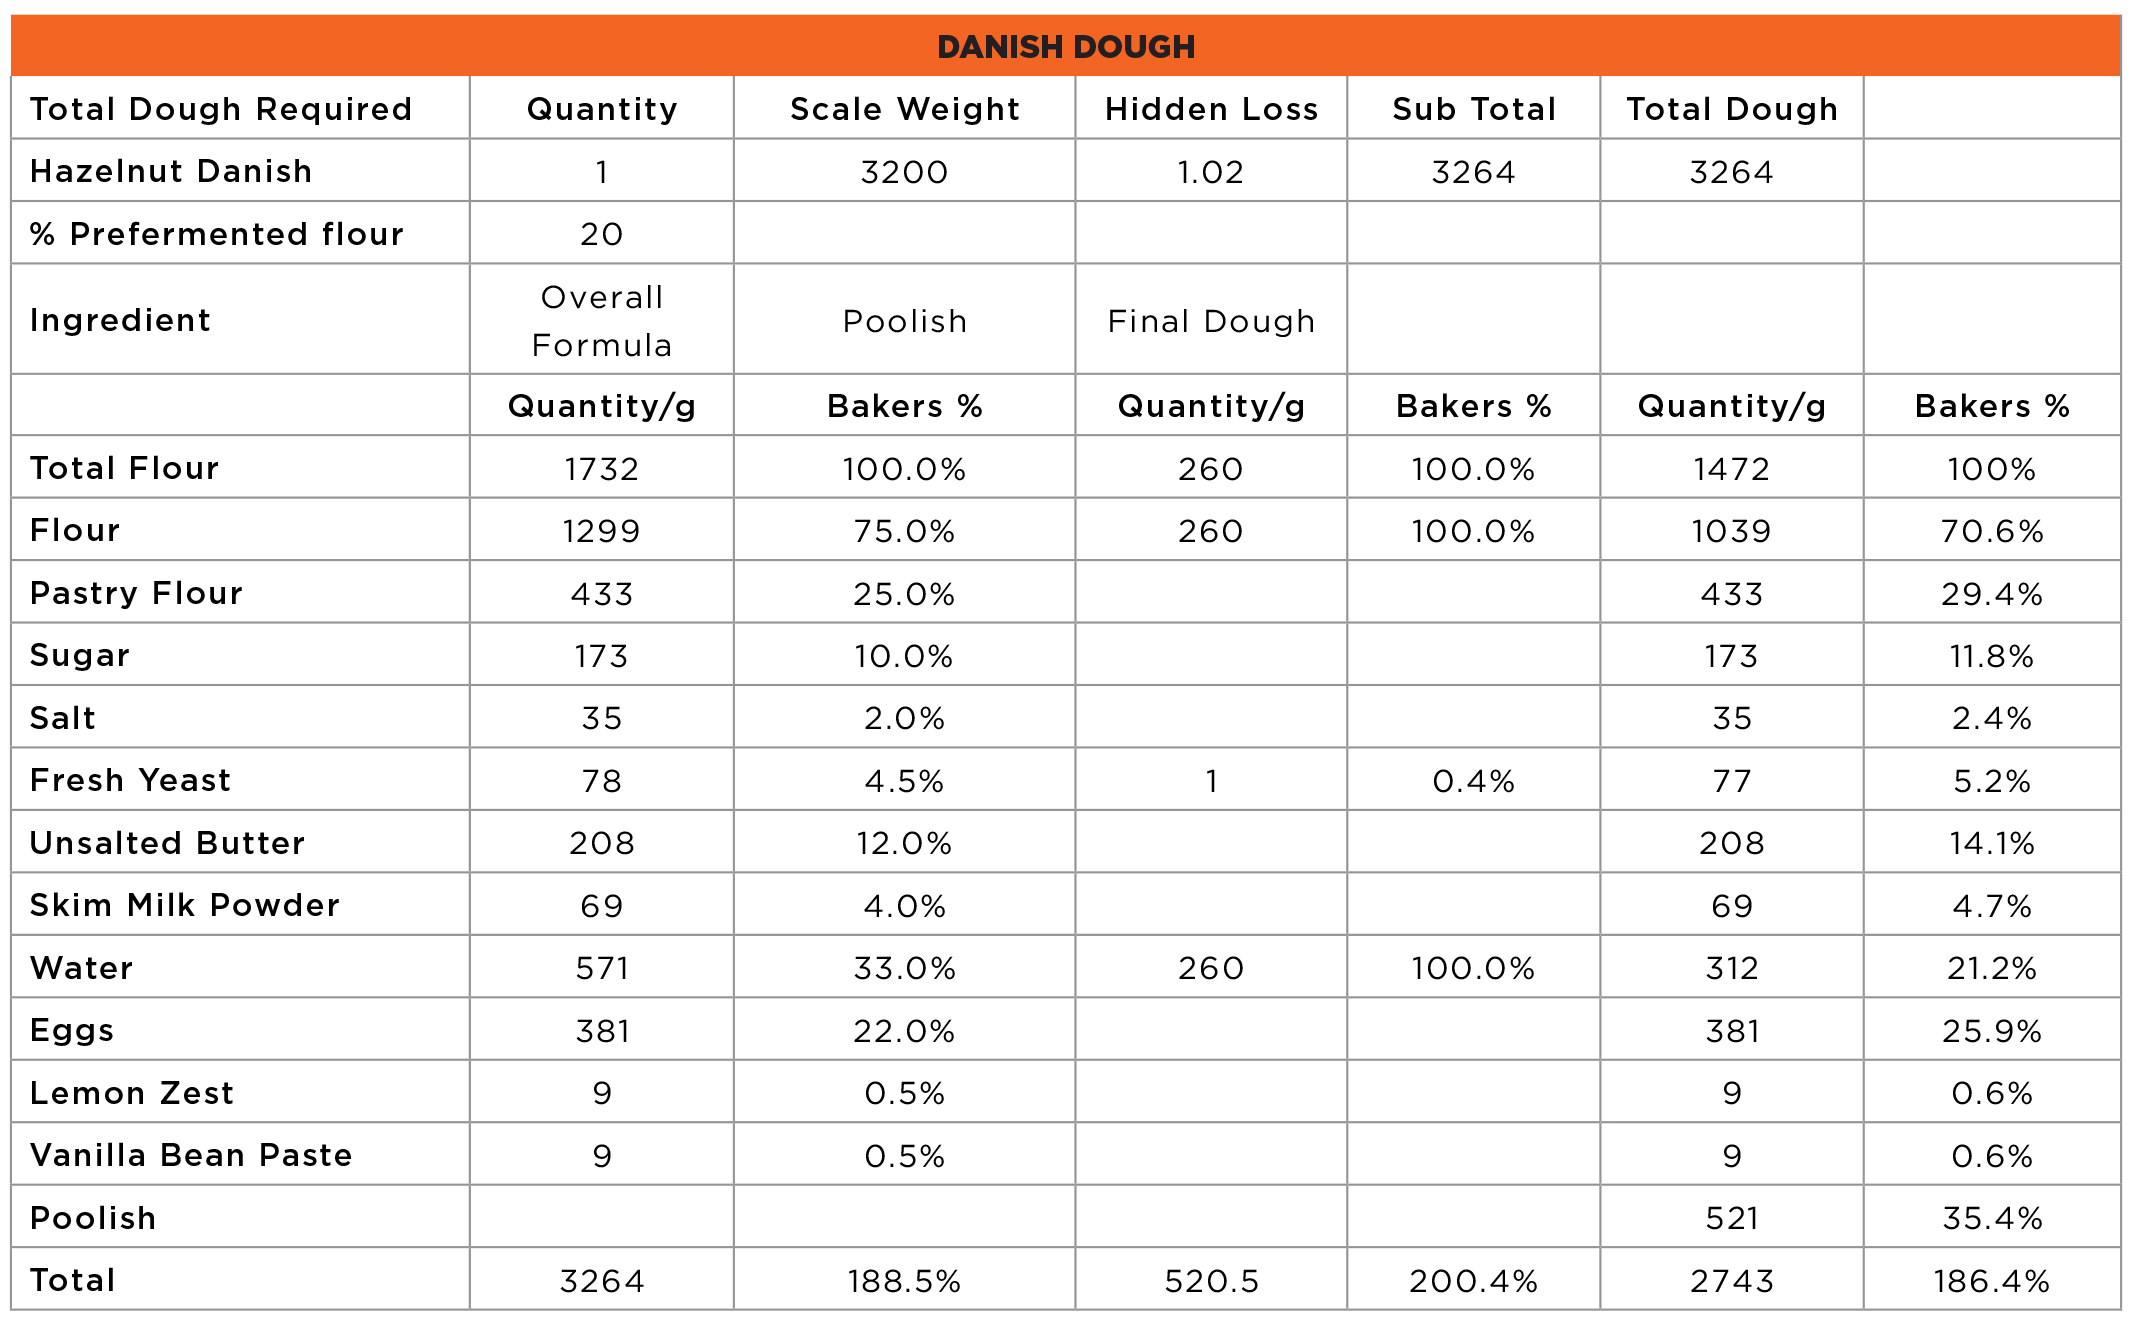
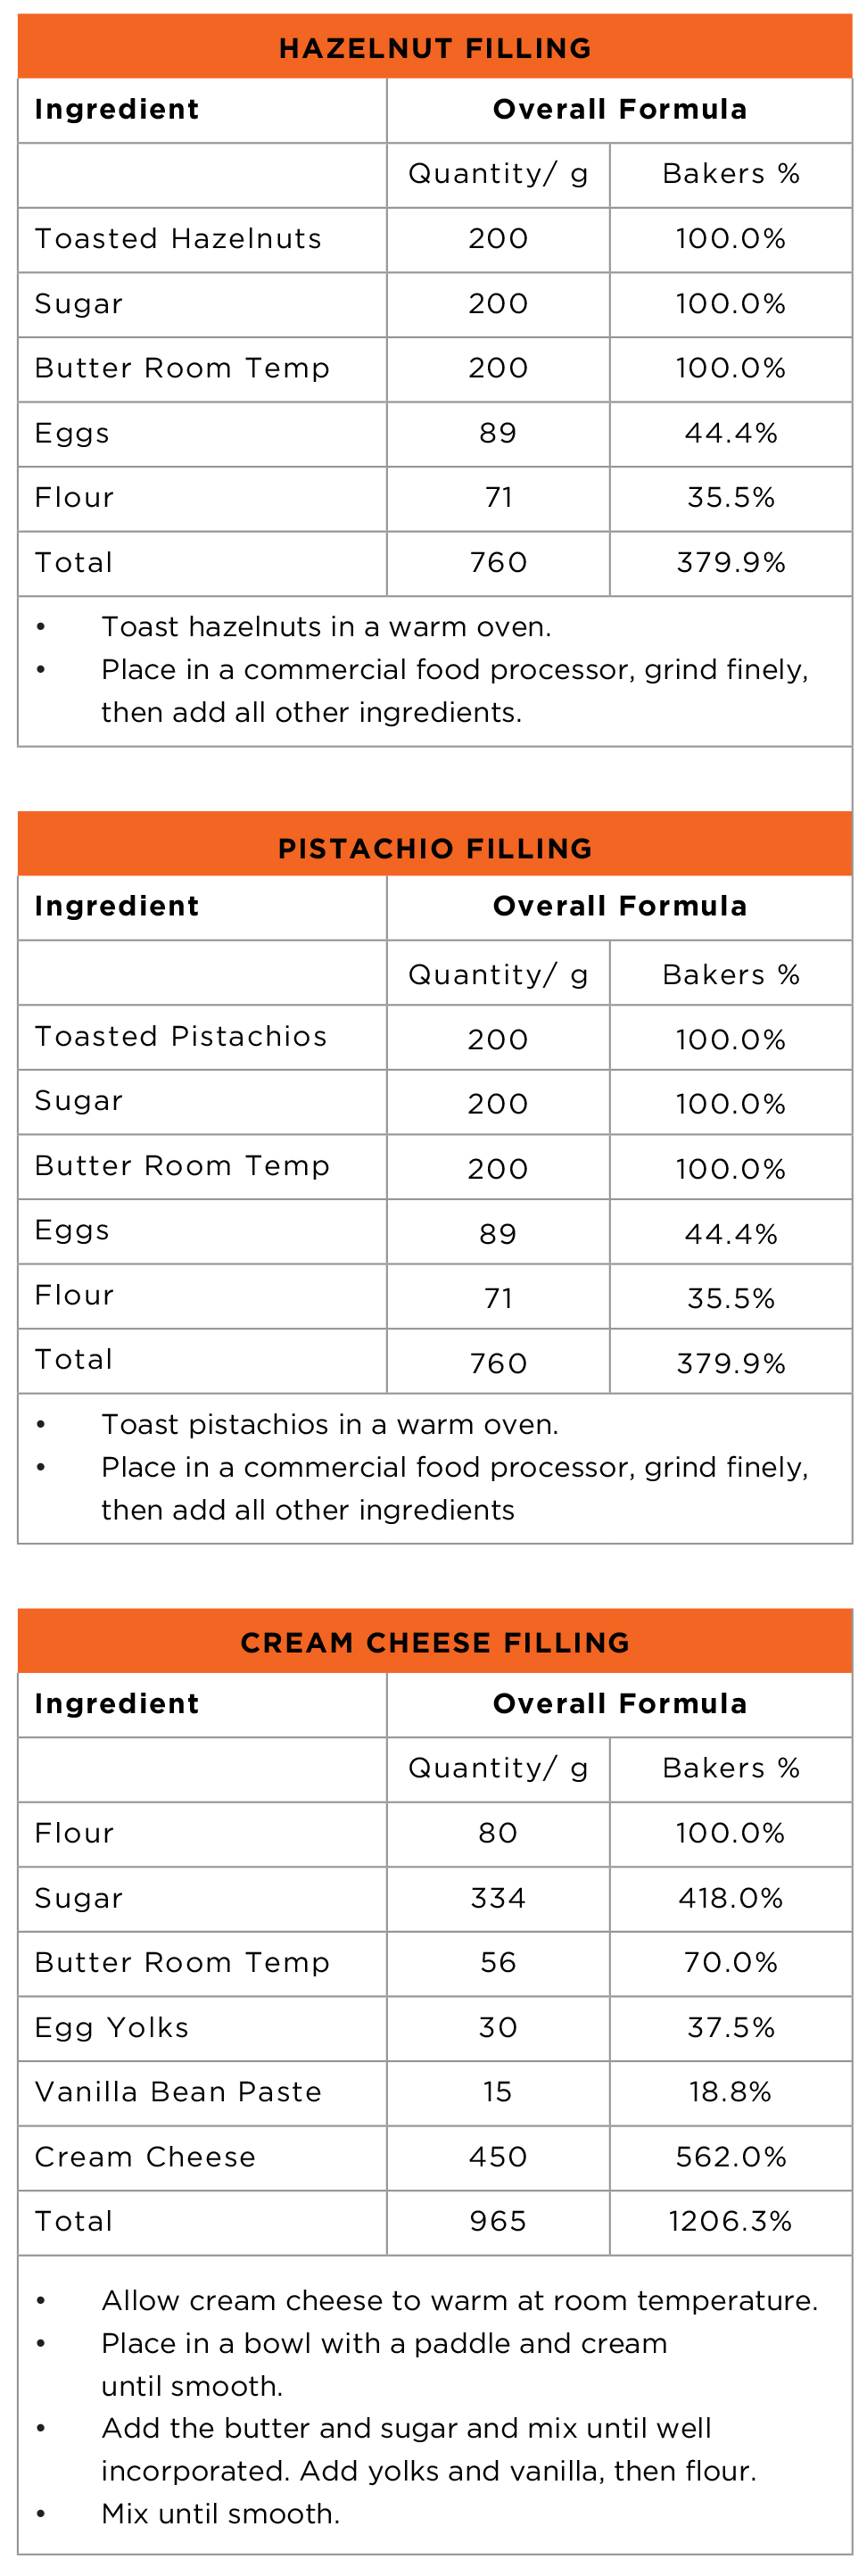
Sweet Danish, unlike its laminated cousin the croissant, is a richer dough because it has eggs and increased amounts of butter and sugar. Milk or milk powder are often added to Danish dough. Flavours are often included in the dough, anything from lemon or orange zest, to spices and vanilla to name a few. Danish has a rich flavor, most often complimented with a fruit or nutmeat filling.
Danish, like the croissant, is laminated with a fat, quite often butter, or a blend of fats such as butter and margarine, or manufactured pastry margarines that are specifically made for laminating. Cost per unit and your retail price points usually determine the type and quantity of roll-in fat used.
Many bakeries, especially in-store, use frozen Danish pastries. Consistency of product and pricing are the main motivating factors for using frozen products. Within the frozen manufactured side of Danish pastries, there is a significant difference in quality. The very inexpensive pastries made with shortening, food colour and butter flavour and emulsions look more like bread dough than a laminated product, but there are also some of excellent quality.
As technologies continue to evolve for equipment makers, so does the quality of finished Danish pastries coming from industrial manufacturers, with the rich butter flavour and distinctive layers now visible. These products look like the skilled hands of a baker laboured over them for hours to achieve such a nice finish. Of course, with great quality comes a great cost. Balancing your ability to purchase, add gross margin and then retail manufactured products vary from customer to customer.
The debate of how we count layers in laminated products is often confusing to most. A common Danish laminating technique consists of the English lock in, where two thirds of the dough is covered in fat, then folded and then three half turns or three single folds are given. The math looks like this: English lock in = 5 layers (3 dough and 2 fat), a single fold is given which triples the layers to equal 15, but to be precise we subtract 2 from this total to take into account the two layers of dough that touch each other when a single fold is given (in essence there are two thicker dough layers). Now we are at 13 total layers. Add another single fold: 13 x 3 = 39 layers – 2 = 37 layers, add the last single fold =111 layers, the – 2 for a total of 109 layers.
In summary: English lock in = 5, first single (5 x 3 = 15 – 2 =13), second single (13 x 3 = 39 – 2 = 37), and third single (37 x 3 =111 – 2) for 109 total layers
I find this method to have too many thin layers that are less visible. I prefer to use a French lock in, with 3 single folds or turns, resulting in only 55 layers. The math is as follows: French lock in = 3, first single (3 x 3 = 9 – 2 =7), second single (7 x 3 = 21 – 2 = 19), and third single (19 x 3 = 57 – 2) to equal 55 total layers.
Another quicker method is to use the English lock in with a book fold and a single fold. The Danish pastry results in thicker, more visible layering. What also makes this method so effective is you can be completely laminated with one trip to the sheeter, and in a matter of 10 minutes all of your laminating is completed. You can do your lock in and two turns back to back. To be successful with this technique you need to ensure your dough is very cold. A note in the math difference: when using book folds, three dough layers come in contact with each other, so we must subtract three from our total layer count. The math is as follows: English lock in = 5, first single (5 x 4 = 20 – 3 = 17), second single (17 x 3 = 51 – 3) to equal 48 total layers.
 |
|
Method
|
Whichever method, or methods you choose, have the end in mind. Do you want to profile the layers as a key selling point? Go with the last option of English lock in with a double and a single turn.
Most of the make-up principles that I outlined in the croissant-making article “Quintessential Croissants” in the March issue of Bakers Journal apply to Danish making.
To review some key points
Use a weaker flour. Winter wheat is preferred and if that is not available then use a weak break flour or an unbleached all-purpose flour. Protein levels under 12 per cent are beneficial.

|
|
To reduce the protein strength further, blend in 20 to 25 per cent pastry flour.
Use a short mix technique, once again to prevent too much protein development.
Keep everything cold! If the dough warms through the laminating or make-up process, the layering will be compromised. Have your dough in the freezer and while warming your butter to 9º C to 11º C.
Once in the final shape, proof in a cooler temperature of 27°C to 29°C. Depending upon how cool your shapes are coming off the table, proofing times can vary dramatically. If you are able to keep the dough very cool through make up you may find a two to three hour proofing time is required. If the dough really warms on you then you may only need one and a half hours of final proof.
Be very careful when egg washing. Use fresh eggs only with a dash of salt.
Competing in the Louis Lesaffre cup, my favorite product by all was my gianduja chocolate pistachio 5 braid Danish. Danish varieties are ever evolving, and savoury products are making their way into bakeries and pastry shops. Explore, and be creative. Make a lemon or orange curd filling, and then make a seafood-filled Danish! The days of simply having a cherry Danish have come and gone, new flavours and techniques are required to make your bakery unique. Why do customers choose to come to you versus your competitor down the road? Be creative, you may even surprise yourself with some of the flavour combinations you create.
Alan Dumonceaux, C.B.S., is a member of Baking Team Canada and chair of the baking certificate program and the school of hospitality and culinary arts at NAIT.
Print this page
Leave a Reply