Quintessential croissants
February 18, 2014
By Alan Dumonceaux
Many bakers shy away from making their own laminated products because
they feel that it takes too long to make and it’s too expensive
Many bakers shy away from making their own laminated products because they feel that it takes too long to make and it’s too expensive, or, when they make their own croissants, Danish, and puff pastry products, the results are mixed and inconsistent. Buying frozen seems to be the logical solution.
 |
|
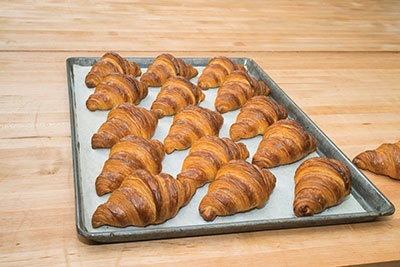
| It is best to use an artist’s paintbrush to apply an egg wash to your croissants. It will work better than the standard pastry brushes you have in your bakery. PHOTO: NAIT
|
The great news is that with new laminating techniques you can make excellent and consistent products with less than one hour of actual hands on time, and in some production techniques you can get from mixing to baked products in less than four hours.
But first we must take a step back and discuss the common problems with laminating and the solutions. For the purpose of this article, we will focus exclusively on croissant production, however most of the rules apply to Danishes as well and with a few modifications, puff pastry too.
Hurdle No. 1: FLOUR
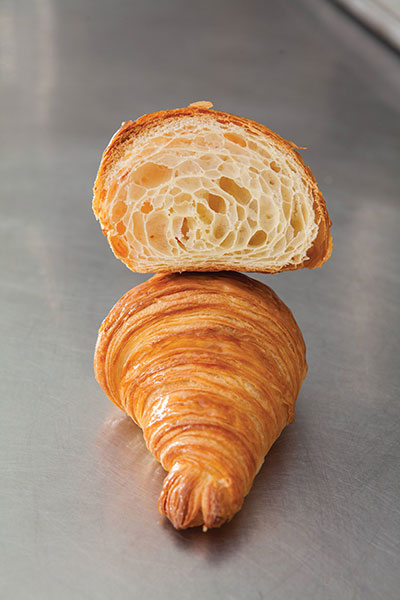
Yes, our great Canadian high protein baker’s flour is not ideally suited for croissant production. Most baker’s flour has protein ranges from 12.5 to 13.2 per cent. This is too strong for making great croissants. The crumb will be tight and closed versus open and very flakey.
As I was preparing for the Louis Lesaffre Cup in 2010, I was already well versed in new and quick ways of laminating, but the crumb of my croissants was always closed. I began to source weaker flour and flours with no treatments. Unbleached all-purpose flour was a good first option, but still not ideal. I then began to work with an untreated winter wheat, which in the end provided the best results for the flours that were easily accessible in Alberta. Lower protein winter wheat with no treatments (i.e. ascorbic acid, azodicarbonamide) is the flour that I find most suitable for croissant production. For your market try and source a lower protein flour, anywhere from 11.5 to 12.8 per cent.
Improvements were coming in the crumb, but still not to the level that I wanted. This is when I began to add pastry flour to weaken the flour further. The long awaited improvement that I was looking for finally arrived! A weak winter wheat with a blend of pastry flour at 20 to 25 per cent seemed to provide the best crumb.
Coming to this conclusion made a significant improvement in the final product.
Hurdle No. 2: BUTTER
The butter used in France has higher butterfat content (84 to 86 per cent) and the process in which it is made enables the butter to remain more plastic in nature. Our regular Canadian butter has more water and only 80 to 82 per cent butterfat. The lower butterfat and higher water content poses challenges in laminating, as the process requires the dough to be placed in the freezer, causing the butter to freeze and then fracture through the laminating and make up process.
This hurdle was causing inconsistencies in the final product. Fortunately, early on I received a great tip from Mario Fortin (the coach of Baking Team Canada). He suggested warming the butter to at least 9 C before laminating. Then Peter Yuen, who was a guest instructor at Nait Bakes 2012, talked about tempering butter as if you are tempering chocolate, so that you get the fat crystals in the correct alignment so they remain plastic in nature. He demonstrated a technique of sheeting the butter between resinite films. Yeun suggested that once the butter is in a plastic state it will remain there. This may hold true to higher butterfat butters, but not the regular lower butterfat butters you purchase from your supplier.
Through trial and error I found that 10 minutes in a freezer (-18 C or cooler) is the maximum time the dough can remain in the freezer. Any longer and the water will freeze and the butter will no longer be plastic in nature, causing the butter to fracture and break apart through any remaining sheeting and laminating.
Overcoming these two hurdles made significant improvements in my croissants. Next we tested pre-ferments. The addition of a preferment to the dough is very beneficial, for both flavour and dough extensibility. The layers in the final product are more pronounced with the additions of a preferment. I have tested croissants with a biga, sponge, poolish, and a levain. In the end, the poolish was the preferred preferment to use because its subtle lactic acid and acidic acid provides a favourable sweetness to the croissant. Now that we resolved the two main issues of laminating, I will further discuss other aspects of croissant production.
Formula hydration can vary significantly. In the end, the percent you choose must balance the shelf life and eating quality versus profiling of the layers. As the hydration increases, the visual appearance of the layering decreases, but the moistness and eating quality improves. Dough hydration at 50 per cent will dramatically enhance the layers, but increased quantities of sugar and fat in the dough of over 10 per cent are required to balance off the dryness of the dough, thus increasing your bowl cost. Doughs with hydration levels above 60 per cent will have a great improvement in eating quality. The visual layers will decrease, but you can lower the fat and sugar levels in the dough.
Deactivated yeast is now making its way into laminated doughs. It acts like a reducing agent, which in the end aids in the dough’s overall extensibility for sheeting purposes.
Mixing times play an important part of successful laminating. Remembering the challenges early on with too strong of a flour. Less gluten development is better, and the stretching and folding action provided by the laminating process further strengthen the gluten. A short mix technique is preferred. Now, this depends on if you mix your dough with a planetary mixer or a spiral mixer, but four to five minutes on low and one to two minutes on second speed is ample. In the end, your gluten window should reflect a short mix technique.
Resting dough before make up makes a difference in the final product. Starting and finishing the croissants on the same day will increase visual layering. Giving the dough an overnight rest in the cooler will improve the flavour with the lengthened fermentation time, but the visual layers will diminish slightly. Depending upon which method you choose, you will favour layering over flavour or flavour over layering.
Roll-in fat percentages should, on average, be around 28 per cent of the total dough. Please note: this is one percentage that we use the total dough as the benchmark versus the flour. Less expensive croissants can be made with 25 per cent roll-in butter to dough, or richer products can be made with greater than 30 per cent roll-in. You choose the percentage that works for your price profile and customer base.
Which method of fat incorporation do you use? English with 3 x 3 folds? French with 2-book folds? The method you choose will have a slight difference in the finished product. Fewer layers will result in thicker layers, which are more visually prevalent and look good, but the finished product’s flakiness maybe marginally compromised. A modified French or English lock-in with 3 x 3 folds will make an excellent product. It adds approximately 10 minutes of overall make up time. Doing 2 books or 1 book and a 1 x 3 fold means that in less than 10 minutes the laminating process is complete, as the lock-in and 2 books, or 1 book and 1 x 3 fold can be done back to back.
The modified French fat incorporation technique that I sometimes use is what I refer to as a “sandwich” technique. I sheet the dough twice as long as my butter block, then place a sheeted butter piece large enough to cover half of the dough (adjust with a bench scraper as required), cut the dough in half and place the second portion on top. On all four sides you will have a visible dough – butter – dough block. This eliminates the folded edge where there is no layering but only dough.
Hurdle No. 3: FERMENTATION
Fermentation – through laminating and make up – is counterproductive to excellent laminating. One of the keys to excellent laminated croissants is to keep the dough cold at all times, this begins with placing the dough in the freezer for 30 to 45 minutes prior to the start of the laminating process. You want the dough to be near 0 C before you commence, then you place the dough back in the freezer between turns (if required) and at the conclusion of the laminating process.
 |
|
| Don’t wrap croissants too tightly. Leave space to allow for maximum oven spring and reduced tension. | |
 |
|
| Formula hydration will dictate the balance of taste and visual layers.
|
I first saw Yuen use a new technique at the Coupe de Monde in 2008. When he was preparing for the Coupe de Monde, he came up with the idea of using ice blankets to speed up the laminating process (ice blankets are commonly used in the medical field). He adopted the practice of placing the laminated dough between two ice blankets, keeping it at his work station, thereby eliminating needless steps going back and forth to the freezer. This also eliminates the common practice of a 30-minute rest between turns in the cooler. The dough stays cold, preventing a rise in dough temperature and the start of fermentation. Since then I have used ice blankets, frozen marble slabs, or just the freezer to rest the dough between turns and at the conclusion of laminating, thereby eliminating the use of the cooler through the laminating process.
After the dough has received all of the folds, it goes back in the freezer for its 10 minute rest, or 30 seconds between two frozen marble slabs or ice blankets. It is then placed in the cooler for a minimum of 30 minutes prior to make up. This allows the dough to relax, and then the final sheeting and make up can commence. At Nait Bakes 2011, Ciril Hitz demonstrated placing the dough back in the freezer before final sheeting and make up. All of the above suggestions are to ensure that the dough stays cold all through the laminating and make up. Once the dough starts to warm and ferment, a significant reduction in overall quality will be visible.
Proofing croissants should be done in a proofer with approximately 80 per cent humidity and be kept between 80 F (27 C) and 84 F (29 C). While attending a class from Jeremy Gadouas of the 2012 U.S. Coupe de Monde Team at the Bread Bakers Guild of America’s Wheatstalk 2012 event in Chicago, he talked about a visual cue that he uses to tell when his croissants are proofed. The visual cue that he uses is when the layers begin to separate in the proofer, then the product is ready for egg wash and baking.
Egg washing croissants is vitally important. The first thing you need to do is go buy an artist’s paintbrush. The standard pastry brushes that we all have in the bakery do not work well when egg washing croissants. You need a very soft bristled brush that will not damage the layers. The second critical point to egg washing is to avoid making contact with the vertical cut edges of the croissant. The egg wash acts like glue and will seal the edges together, inhibiting maximum oven spring and profiling of layers. Being careful to only egg the horizontal layer does take a few more minutes, but the time investment results in improved product quality.
Baking in a convection oven with steam is preferred. Until recently, my products have had too thick of an outer layer. This resulted from too long of a bake at 370 F (188 C). We have a double rack oven at Nait. When we load and steam, the internal temperature drops 50 F (10 C) and takes two to three minutes to recover. To compensate for this, we now set the oven temperature to 50 F (10 C) hotter so it will be 420 F (216 C), load the oven and steam, then set the temperature to the desired baking temperature of 370 F (188 C). In the end, once we load the oven and steam, the oven will drop to the desired baking temperature, reducing the overall bake time and eliminating the thick crust. Some testing maybe required in your shop based on the type of rack oven you have, but this adjustment did make great improvements in the product.
Here are a few key points to remember:
- Find a lower protein flour and experiment with adding 20 to 25 per cent pastry flour.
- Keep the dough cold through laminating.
- Work quickly when making your final shape. If you have a large head of dough sheeted out for the final shaping, place silicone paper over two-thirds of the dough and place frozen baking pans on top to delay fermentation until the product is in its final shape.
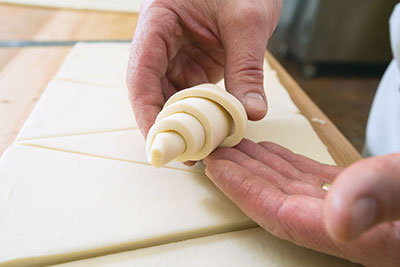
- Don’t wrap your croissants tightly. Leave a space to allow for maximum oven spring and reduced tension.
I hope these techniques and suggestions that I have learned help you make a better croissant in less time in your bakery. / BJ
Alan Dumonceaux, C.B.S., is a member of Baking Team Canada and chair of the baking certificate program and the school of hospitality and culinary arts at NAIT.
Print this page
Leave a Reply